Adam
A traditional wood-fired pizza oven, or more commonly known as masonry oven, is a type of cooking equipment which consists of a baking chamber made out of bricks, clay, concrete, stone, cob or ceramics. It is commonly made with a simple floor of fire bricks and is fueled by firewood. It is designed specifically for making pizzas, however, a variety of meals can also be cooked depending on the temperature the oven has. Pizza needs to be made at very high temperatures from all sides of the oven, therefore, an oven design should be able to withstand high levels of heat. The oven can be created by raw materials from scratch, or purchased as a partial or complete kit.
Overview
A well-made oven will take up to 90 seconds to cook a ready-to-eat pizza. Wood-fired ovens work by creating fire inside a chamber with a solid floor and overhead insulation. This insulation works by gradually increasing heat to very high temperatures of over 370°C (700°F) which is the optimal temperature for cooking pizzas.
It generally takes up to two hours from starting the fire to cooking a pizza. Once the oven reaches the required temperature, the fire is then moved aside or positioned at the deeper end of the chamber to make room for the pizza. After cooking, the residual heat can be used to cook other dishes that need less heat to bake. The oven insulation ensures that the oven remains hot for long periods of time which can sometimes last up to 12 hours. Whether built of brick or cob, the pizza ovens are aesthetically pleasing and add to a property's value and are generally admired by friends and family.
Wood-fired ovens are primarily known for pizza cooking specialty. However, these type of ovens can be also used for baking bread, cooking steak, roasting meat and preparing ingredients such as sun dried tomatoes.
Building a pizza oven is fairly straightforward and involves the following steps:
- Choose a size and adopt a construction plan.
- Source the materials or purchase a kit.
- Build a foundation (out of wood, brick, stone etc).
- Create a hearth insulation.
- Add sand bed and hearth of firebricks.
- Place a dome (out of bricks or cob).
- Attach a chimney and flue.
- Create another insulation (out of vermiculite, perlite, fire blanket or a mix).
- Do some cladding and add a door.
History
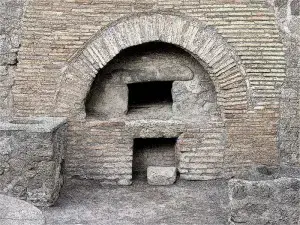
Oven in the ruins of Pompeii, Italy
Through history, many versions of the pizza were already present in various civilizations. It first came out in Egypt where a pizza-like bread emerged. However, Italy’s version of the dish—the one we all are familiar with—consists of tomato, cheese, other seasonings and toppings. This specific pizza was created by baker Raffaele Esposito in Naples for the visit of King Umberto and Queen Margherita of Italy back in 1889. His creation was an instant hit. Since then, pizza has evolved and so has its methods of preparation. Today, there are a variety of pizza ovens in the market offering various modalities, all claiming to make the best pizza. They come in various shapes, sizes, capacities, mobility, and commercial usages.
Oven Types
When building a pizza oven, most people are unsure of which oven shape to choose: either the rectangular barrel oven domes or round igloo oven domes. Most restaurants commonly use the Rectangular Barrel model. Both domes use the same production procedure; take the same amount of time to heat up, and produce even quality pizzas without leaving cold spots. However, professional bakers prefer the Rectangular Barrel Domes, which give them more space and allow making more pizzas at a time. For personal or home use, space and quantity are not an issue, so either shape will suffice.
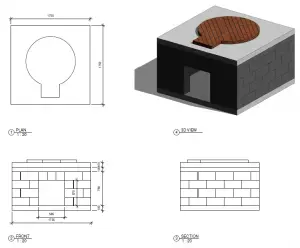
Building (Igloo or barrel inside)
Pizza Oven Building Plans
A number of pizza oven building plans exist due to the wide range of techniques by which a wood-fired pizza ovens can be built.
Choosing an Oven Size
Choosing the size of an oven largely depends on a number of factors:
- The quantity of food to be cooked
- The size of the pizza
- The building materials and budget
- The space available for construction
Cob ovens are not as tough as brick and mortar ovens, hence, are generally smaller in size. Additionally, cob ovens are made of cheaper materials which are very suitable for individuals with a constrained budget.
Ovens constructed for restaurants and other commercial purposes need to be more durable and larger in size. This is because they need to accommodate pizzas of any shape, size and quantity. However, taking these pointers into account can mean higher costs, extra fuel requirements to heat the larger area and would require professional builders to create a structurally stable oven made for your needs.
The following are examples of dimensions you may want to consider while deciding on the size of your pizza oven:
| Internal Dimensions | Hearth Surface Area | Dome Shape | Recommended User |
|---|
| 34" diameter (86cm) | 907inch2 (5,808cm2) | Igloo | Small family cooking pizza |
| 42" diameter (106cm) | 1,385inch2 (8,824cm2) | Igloo | Large family |
| 50" diameter (130cm) | 1,963inch2 (13,273cm2) | Igloo | Restaurant |
| 32" x 36" (82cm x 92cm) | 1,152inch2 (7,544cm2) | Barrel | Small family |
| 35" x 39" (90cm x 100cm) | 1,365inch2 (9,000cm2) | Barrel | Large family |
| 47" x 59" (120cm x 150cm) | 2,773inch2 (18,000cm2) | Barrel | Restaurant |
Length of Construction
The time and effort required for the construction of a pizza oven depends largely on the material and size of your oven. Sourcing professional materials such as fire bricks and fire blanket can be difficult, time-consuming, and may not be readily available depending on your location and local industry. To make construction easier, pizza oven kits are available for sale which include a majority of the difficult to acquire materials, such as garden mud. However, for a professional builder with access to the required materials and skills, the construction of a large oven is quick and easy as compared to an individual completing a 'do it yourself' construction on the weekends.
Constructing a cob oven generally requires lesser skills and allows utilizing cheap and readily available materials. Cob ovens are recommended for beginners as a means to gain experience on building pizza ovens, without incurring large expenses and time commitment involved with a larger brick oven. The following table gives a rough guide for the time required to construct an oven, whether by a DIY or a professional builder, with a kit or using raw materials. The durations provided include the time required to source the materials, which, for some individuals, may increase the time of completing their pizza ovens.
| Internal Dimensions | Material | Shape | Builder | Kit | Duration |
|---|
| 34" diameter (86cm) | Cob | Igloo | DIY | Raw materials | 1 - 2 days |
| 34" diameter (86cm) | Brick | Igloo | DIY | Pizza oven kit | 2 - 4 days |
| 34" diameter (86cm) | Brick | Igloo | DIY | Raw materials | 4 - 10 days |
| 34" diameter (86cm) | Brick | Igloo | Professional Builder | Raw materials | 1 - 2 days |
| 35" x 39" (90cm x 100cm) | Brick | Barrel | Professional Builder | Raw materials | 2 - 4 days |
| 47" x 59" (120cm x 150cm) | Brick | Barrel | Professional Builder | Raw materials | 3 - 5 days |
Building Costs
Wood-fired ovens have been existing across various civilizations. Romans were able to create the modern form of the pizza oven from thousands of years ago. In this regard, the famous Pompeii Pizza Oven has become a rave for many wood-fired oven-building enthusiasts. They have patterned builds from the brick ovens unearthed in Pompeii—all of which are still in superb condition and are viewable in the popular ruins.
In any way or composition the oven is planned to be built, costs will vary widely based on the source of the materials and size or extent of the oven and enclosure.
When on a tight budget, it would be best to look for free or readily available materials (recyclable would be much better) to build your oven. Salvage secondhand bricks that were left over from construction projects and houses. On the other hand, the oven dome can be made out of cob from raw materials that can be found in your backyard.
The costs would likely increase when opting to create a large oven with quality bricks, supporting structure and cover and stylish cladding. Hiring a contractor to source the materials and build the oven would make it more pricey. When aiming to lessen the burden of sourcing the materials needed in building an oven, an option would be purchasing a partially constructed oven kit.
The table below shows the general cost ranges for a DIY construction:
| Internal Dimensions | Hearth Surface Area | Dome Shape | Material | Cost |
|---|
| 30" diameter (76cm) | 706inch2 (4,363cm2) | Igloo | Cob | $0 - 600 |
| 34" diameter (86cm) | 907inch2 (5,808cm2) | Igloo | Cob | $0 - 600 |
| 30" diameter (76cm) | 706inch2 (4,363cm2) | Igloo | Brick | $400 - $2,000 |
| 34" diameter (86cm) | 907inch2 (5,808cm2) | Igloo | Brick | $500 - $2,600 |
| 42" diameter (106cm) | 1,385inch2 (8,824cm2) | Igloo | Brick | $600 - $3,000 |
| 50" diameter (130cm) | 1,963inch2 (13,273cm2) | Igloo | Brick | $700 - $3,500 |
| 32" x 36" (82cm x 92cm) | 1,152inch2 (7,544cm2) | Barrel | Brick | $500 - $2,600 |
| 35" x 39" (90cm x 100cm) | 1,365inch2 (9,000cm2) | Barrel | Brick | $600 - $3,000 |
| 47" x 59" (120cm x 150cm) | 2,773inch2 (18,000cm2) | Barrel | Brick | $700 - $3,800 |
| 59" x 71" (150cm x 180cm) | 4,189inch2 (27,000cm2) | Barrel | Brick | $800 - $5,000 |
- Further information: Sourcing materials for building a wood fired pizza
Building Materials
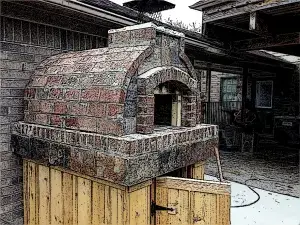
Barrel brick wood fired oven
The durability of an oven is determined by the construction materials used. The building elements will also determine how quickly the oven heats up, how long the heat lasts, how quickly the heat dissipates along with other factors to consider.
Most ovens are either built from bricks or clay—both material possessing its own set of advantages and disadvantages. It is important to scrutinize material standards and their effect on the quality of the oven. Material type and quantiy required depend ultimately on the oven size and style chosen.
Brick
If building an oven for personal use, using fire bricks are highly recommended. Having this form can guarantee low maintenance costs and easy upkeep. On the contrary, clay ovens require extra attention during construction. The oven chamber may peel or crack if not put up properly.
Brick ovens use 75 percent of the heat generated from wood fire and lose the 25 percent of the heat through the chimney. This serves as proof that brick ovens are exceptionally fuel efficient. Fire bricks absorb heat impeccably with the use of high aluminum content and have proficient thermal conductivity. In addition, bricks contain heat-tolerance features making them ideal for extended use.
| Materials | Tools |
|---|
| Fire Clay Fire Bricks Sand Mortar | Bricklaying Trowel Plastering Trowel Rubber Mallet Spirit or Builder's Level Pencil Square Shovel |
Quantity of Bricks Needed
| Material | 32" x 36" (82cm x 92cm) dome | 35" x 39" (90cm x 100cm) dome | 47" x 59" (120cm x 150cm) dome | 59" x 71" (150cm x 180cm) dome |
|---|
| Besser Blocks for Foundation (190 x 190 x 390mm) | 40 | 43 | 61 | 75 |
| Fire Brick for Hearth (76 x 230 x 110mm) | 26 | 30 | 44 | 60 |
| Fire Brick for Dome (76 x 230 x 110mm) | 160 - 240 | 200 - 300 | 330 - 500 | 500 - 900 |
| Bag of Cement | 4 | 6 | 10 | 12 |
| Bag of Sand | 12 | 18 | 30 | 36 |
| Insulation (Fire blanket) | 3 m2 | 4 m2 | 5 m2 | 7 m2 |
Cost
Deciding on the type of build, materials and use of the oven will give direction to how much the entire construction costs. Expenses can be cut down by using alternative materials; for instance, using traditional red house bricks over fire bricks cuts back costs considerably. Below lists example of prices and estimates for the materials required for constructing a pizza oven which can be used as a guide to prospective builders:
| Material | Cost | Generally Required | Average Total Cost |
|---|
| Foundation Besser Blocks | $3 each | 60 | $180 |
| Fire Bricks (Hearth and Dome) | $2 per brick | 250 | $500 |
| Fire Clay | $25 per bag | 2 bags | $50 |
| Bag of Cement | $5 per bag | 20 bags | $100 |
| Reinforcement Steel | $3 per meter | 20 meters | $60 |
| Bag of Sand | $4 per bag | 30 bags | $120 |
| Insulation (Fire blanket) | $75 per m2 sheet | 4 m2 | $300 |
| Insulation (Vermiculite) | $15 100L bag of Vermiculite | 1 bag | $15 |
Fire Bricks
A refractory brick, also called fire brick, is used in pizza ovens due to its ability to withstand high degrees of heat. These bricks are made with fire clay which has a high alumina content.
Refractory Mortar
Where flat fire brick joints are difficult or impossible to use, refractory mortar comes in. However, it should be considered that a maximum application of refractory mortar must not be over approximately 1/4" (6mm). This is because building beyond this measurement is would shrink or crack the oven with time. Avoid using refractory mortar for filling holes in the ovens or empty spaces. It is only suitable for external use. Meaning, it is used on the oven dome which is not in direct contact with the fire.
If you don't want to buy a pre-mixed refractory mortar, use the following recipe to create your own:
- 3 parts sand
- 1 part Portland cement
- 1 part lime
- 1 part fire clay
Cement
Cement is a powdery substance made from calcined clay and lime that is used as a binder in construction projects. Cement is mixed with other constituents at varying ratios to form different building components such as mortar and concrete. This material is frequently used in making pizza ovens. Depending on its composition and color, cement is classified as follows:
- High alumina cement
- Acid resistant cement
- Hydrophobic cement
- Blast furnace cement
- Acid-resistant cement
- Expanding cement
- Portland cement
- Low heat cement
Clay (Cob / Earth / Horno / Adobe)
Clay is the essential material used for binding all building constituents when making a clay oven. An oven built from clay can be much smaller from ones used in establishments and food chains but can be adequate enough to make food for a large group of people.
The heat produced in a clay oven is evenly spread, therefore it does not leave cold spots on the pizza. Clay ovens remain hot for long periods of time which could allow cooking more food of a wide variety. Best of all, clay is available in your backyard if you dig deep enough. One feature of clay is that when wet, it is sticky and turns hard when dry.
For insulation, and improved binding results, clay is mixed with sand and straw. Sand reduces shrinkage, while straw covers the insulation part. Depending on local temperature and weather conditions in your area, users will need to mix the right proportions of clay, sand and straw for best results.
| Materials | Tools |
|---|
| Fire Clay Soil Straw Sand | Protective gloves Dust mask Wheelbarrow Level Shovel |
Cost
In contrast to traditional brick ovens, cob ovens are considerably cheaper to build. If you are on a limited budget or have no funds for materials, you can build your cob oven literally out of materials available in your backyard. However, it is recommended to invest on either standard red builder bricks or fire bricks to create the hearth for better quality and a guaranteed lifespan. This will provide a clean, reusable and dependable surface for placing food. In addition, a bonding agent should be utilized such as hay or grass to prevent the breakdown of the dome over time. The hay acts as a binding agent within the cob, holding the material together even when cracks form. The table below lists materials and estimates on the required quantities and costs involved:
| Material | Cost | Generally Required | Average Total Cost |
|---|
| Sand | Free or $4 per bag | 5 bags | $20 |
| Newspaper | $1 per paper | 1 | $1 |
| Fire Bricks (Hearth) | $2 per brick | 25 | $50 |
| Mud | Free | Lots | Free |
| Hay | $5 per 50 pound square bale | 2 | $10 |
Building a Pizza Oven
Constructing the fire brick dome
If you follow the right guide, it’s fairly easy to construct a pizza oven. Despite the dome style and size you choose in the end, all pizza oven structures share similar basic parts. All these play a crucial role in making a very efficient pizza oven. This requires precaution should be taken during construction. These parts include:
- Foundation
- Hearth
- Dome
- Vent
- Flue
- Chimney
Location
When selecting a pizza oven site the following factors should be taken into account:
- Weather conditions and shelter
- The pizza oven should be constructed in a sheltered area to protect it from rain and sun exposure. For the outdoor construction of an oven, a simple pergola may be erected for shade. For indoor placement, the oven should be placed near or in the kitchen, with sufficient modifications to allow the installation of the chimney. Having the oven installed indoors would make a fine warmer during bad weather conditions and could be easily accessible any time.
- Governmental or council laws and regulations
- Existing laws may impose restrictions on the placement of a pizza oven. Regardless of the location of a oven, council approval or legal advice is required.
- Fire hazards
- Wood-fired ovens require burning heat, making it essential to consider safety implications. For this purpose, owners should survey the area surrounding the potential oven site to ensure no flammable material is present. There should also be no risk of injury caused to children and adults. It is advised to ensure that the height of the hearth is high enough to be inaccessible to children. When a fire is burning, it is possible for hot embers to fly off. Therefore, a safe distance from the house should be maintained.
- The placement of an oven may determine its usability and how frequently people have the forethought to use it.
- Structural integrity of the foundation surface
- When deciding on the surface of the foundation, it is vital to consider the structural integrity of the pizza oven. It is advised to erect the oven on hard ground due to the immense weight of the oven. If placement of the oven is made on a raised deck or veranda, it is necessary to seek the advice of an engineer on strengthening the surface to be able to take the additional weight of the oven.
- Usability
- Placing the oven in a frequently occupied areas such as the kitchen or pool means it will more likely be used than if placed in a remote area infrequently visited or out of plain sight. Some individuals choose to build the oven upon a trailer so as to enable relatively simple transport of their brick or cob oven.
- Aesthetics
- A well designed and properly built pizza oven is aesthetically pleasing to look at. The oven should be placed in a location where it can be seen and admired for its purpose and architectural design. It should be located in an area where guests can be brought over, either those who are traveling through or eating a meal made fresh from the oven.
- Property value
- With the addition of an oven, the property value of a house may be increased by more than the incurred costs of sourcing and building the oven. Decide upon an area for the placement of an oven that may be viewed by a potential future buyer of the property. However, a pizza oven placed in an inconvenient location or ill-designed in a prominent location may reduce the future property value.
Foundation
To begin constructing your pizza oven foundation, first things first: you need to setup a flat, solid surface. If you are building your oven directly on the earth, this will involve removing grass with a spade to expose the soil. However, if you intend to build your pizza oven on an existing structure, you will need to ensure that the weight of the pizza oven and its foundation will not compromise the structure. Some of the materials used in a pizza oven are extremely heavy and building on a wood platform may cause cracks and breakages to occur. When building your pizza foundation, consider the potential extensions you might want to add such as a barbeque, sink, wood holder etc. These will require more space and add onto the weight being placed on the structure.
The foundation of your pizza oven may be made out of a variety of materials, including:
- Wood
- Railway sleepers
- Hardwood planks
- Bricks
- Concrete besser blocks
- Housing bricks
- Stone
Hearth
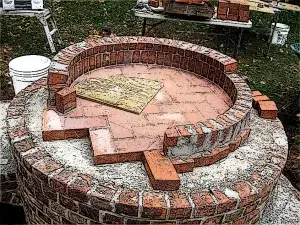
Oven hearth with offset pattern bricks
The hearth is the main part of the oven and is used both for cooking and placement of the food. The hearth is a slab raised above the base of the oven. It is a clean, flat surface of medium density fire bricks. The vault of the oven is the open space above the hearth in which hot air circulates. Fire bricks are used for their ability to withstand extreme temperatures generated by the oven fire. In order to prevent a buildup of waste or debris between the bricks, they are packed together as close as possible without the use of mortar. Mortar will crack upon overexposure to heat. The sand underneath the bricks gives a completely flat surface and allows the bricks to be adjusted with a rubber mallet. An ideal hearth size for home pizza ovens is 32" x 36" (82 cm x 92 cm).
Dome
The width of the dome determines the cooking space that will be available to you, while the height of the dome is generally 3/4th of the width. The main purpose of the dome is to both contain and enclose the heat generated by the fire. The heat energy is evenly absorbed into the dome and which still can be used for cooking even when the heat source is removed. The practice is to construct a brick or cob dome, instead of installing a pre-assembled dome. This type of dome have a tendency to develop cracks and peel off, especially if lesser quality refractory ingredients were used during its manufacture.
The height of the dome and door both affect the air circulation and heating, making its measurements essential. The ideal heights are generally around:
- Entry door height: 10 inch (25.4cm)
- Vault height (internal): 16 inch (40.6cm)
The dome of a pizza oven can be constructed in a number of ways:
- Use wet sand to build a dome shaped form, and then mortar the bricks by laying them against the form.
- Use wet sand to build a dome shaped form, and then place wet newspaper and cob over the sand.
- Cut styrofoam to the dome's outline and place it inside your dome. Remove after the dome is completed.
- The most common method is the free-standing dome which uses series of fire brick circles that are built on top of each other and are self-supporting. Existing models can be used as guide but is not necessary for skilled bricklayers.
| Internal Dimensions | Hearth Surface Area | Dome Shape | Vault Height | Door Height | Door Width | Flue Width | Foundation | Pizzas (10") |
|---|
| 30" diameter (76cm) | 706inch2 (4,363cm2) | Igloo | 16" (41 cm) | 10" (25 cm) | 16" (41 cm) | 18" (46 cm) | 53" x 66" (135cm x 145cm) | 1-2 |
| 34" diameter (86cm) | 907inch2 (5,808cm2) | Igloo | 16" (41 cm) | 10" (25 cm) | 18" (46 cm) | 20" (51 cm) | 57" x 70" (145cm x 180cm) | 2-3 |
| 42" diameter (106cm) | 1,385inch2(8,824cm2) | Igloo | 18" (46 cm) | 11" (28 cm) | 18" (46 cm) | 20" (51 cm) | 65" x 78" (165cm x 200cm) | 4-5 |
| 50" diameter (130cm) | 1,963inch2(13,273cm2) | Igloo | 22" (56 cm) | 14" (36 cm) | 18" (46 cm) | 20" (51 cm) | 73" x 86" (185cm x 220cm) | 7-9 |
| 32" x 36" (82cm x 92cm) | 1,152inch2(7,544cm2) | Barrel | 16" (41 cm) | 10" (25 cm) | 16" (41 cm) | 18" (46 cm) | 55" x 72" (140cm x 180cm) | 1-2 |
| 35" x 39" (90cm x 100cm) | 1,365inch2(9,000cm2) | Barrel | 18" (46 cm) | 11" (28 cm) | 18" (46 cm) | 20" (51 cm) | 58" x 79" (150cm x 200cm) | 3-4 |
| 47" x 59" (120cm x 150cm) | 2,773inch2(18,000cm2) | Barrel | 22" (56 cm) | 14" (36 cm) | 18" (46 cm) | 20" (51 cm) | 70" x 99" (180cm x 250cm) | 5-6 |
| 59" x 71" (150cm x 180cm) | 4,189inch2(27,000cm2) | Barrel | 28" (71 cm) | 18" (46 cm) | 22" (56 cm) | 26" (66 cm) | 82" x 111" (210cm x 280cm) | 10-12 |
Vent / Chimney
The chimney has many functions: it improves airflow through the oven, provides an escape route to smoke and diffuses nearly 1/4th of the heat in a brick oven. The height of the chimney depends on the size of the oven, ranging from 1 meter and above. Some people choose not to build a chimney in their ovens which leads to cooking problems, limits the effectiveness of the oven and causes an excess of smoke buildup.
The vent of an oven can be constructed with bricks, cast or steel—with each material has its own advantages depending on the usage. Having a vent will allow heat to escape out of the inner chamber/dome. It is usually placed on outside of the pizza oven which can be hidden from view using decorative elements. There are two areas for placement of vents:
- Front
- Center
In traditional ovens, the vent is located in the front while the vent is located at the center of the dome for modern designs. Both connect to the chimney to allow heat and smoke to escape. The center vent has the benefit of transferring the hot air over the top of the oven and may help improve heat distribution. There is another design called "vent in the oven" where the vent is placed inside the rear part of the oven which circulates more heat for shorter cooking times.
Flue
The flue is the opening that allows heat, gas or smoke to pass through the chimney. This opening should be placed at the face of the oven, in front of the door. Flue draws the smoke and gases up and away from the oven through the chimney. If not placed properly, the oven may release more heat than necessary, thereby affecting the efficiency of the oven. The flue needs regular cleaning to avoid clogging. It is necessary to use a fireproof mortar for joining the flue liners, while the voids between flue linings must be insulated.
Door
Traditional wood fired ovens do not require a door. However, a door may be installed to optimize heating, increase the time the oven retains the heat post-lighting and maintain consistent temperature.
The oven door can be made of either iron or hardwood. The advantage of using iron is that the door will not be ruined in high temperatures. However, it can become extremely hot and touching it would cause severe burns. Opting for a wooden door can devoid burns; however, it may set aflame when exposed to fire. To avoid this from happening, simply soak your wooden door in water for at least an hour before use. A great idea would be installing a wooden door with a metal covering on the inside to acquire the benefits of both types.
The height of the door should be calculated by the height of the inner oven vault in order to maintain airflow throughout the oven. The optimal ratio of vault height to door height is 100:60. For example, a vault height of 18” (46 cm) correlates to a door height of 11” (28 cm).
Heat expansion
When the pizza oven heats up, the dome will naturally expand. This expansion can lead to cracks and tears in the dome. To prevent this, heat-resistant insulation should be applied on the dome. In addition, this will ensure that the dome stays hot for long periods by locking in the heat. Either Perlite or Vermiculite can be used for this purpose to add extra layers of heat-resistant insulation on top of the oven dome to increase cooking time potential.
Thermal Insulation
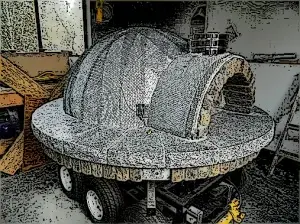
An igloo pizza oven with ceramic blanket insulation and chicken wire
Thermal insulation is necessary for the oven dome and hearth to prevent heat loss. Improper thermal insulation will lead to heat loss and a lack of sustainable cooking temperature. The aim is to maximize the duration of preserving and maintaining heat inside the oven dome. There are different refractory insulation types from which a builder can choose from such as:
- Perlite or Vermiculite which can be used as a dry and loose form of heat insulation.
- Ceramic Fiber Blankets which are a bit costly but can provide excellent insulation without additional heat insulation.
- Ceramic Fiber Blanket
Cladding

Neapolitan wood ovens are traditionally finished with mosaic tiles
The final layer of the oven is called cladding which may either be made of concrete or bricks. Some prefer the aesthetics of a brick layout and utilize fire bricks for the internal dome. It may be finished off with a final cladding layer of regular building bricks over the top of the insulation. Not only is this less costly, but it also increases the amount of time that the oven stays consistently hot. Cladding provides the following advantages to your oven:
- It serves as an additional layer of insulation and adds to the thermal capacity.
- It can cook items utilizing lesser time, since cladding encloses heat for a longer periods.
- It slows down the drop in temperature of the oven.
- Aesthetically improves the appeal of the oven.
Drying
Building a pizza oven is a tedious and time consuming job. And once you’re done laying that last brick, or plastering that last scoop of cob, you’re still not quite done yet. For a perfect oven, it’s recommended to let each layer dry after construction.
For instance, once the base bricks have been laid, it's important that the bricks be allowed to dry, to result in a solid, sturdy base for the next stages of oven construction. The same goes for all other parts of the oven.
Shelter
When building a pizza oven in an external location, it is important to consider the effects of weather on the materials the oven is constructed from. In such instances a shelter is recommended to protect the oven from rain and intense heat. A pizza oven is generally quite rugged and may withstand the wind, snow, hail and rain. However problems might occur if water is allowed to seep into the oven walls. For cob ovens the weather might challenge the structural integrity of the oven.
Water within the walls poses a problem when firing the cob or brick oven. The water heats up then is converted into steam which could force to escape and may crack the oven walls. There are two solutions to avoid this: build a shelter for the oven or build the oven inside an existing structure. This structure may be built from any material; however, risk of fire outbreaks should be considered and a suitable airway for the smoke to escape from the oven should be in placed. A pizza oven placed directly under a roof without a proper chimney will most likely destroy the roofing with smoke and soot.
First Firing of the Pizza Oven
Before you fire up your pizza oven for the very first time, it is vital to ensure that all materials have dried completely, and the concrete or mortar has cured. The longer period you give for the concrete to dry, the stronger and resilient it becomes. It is beneficial to wrap the oven in builders plastic or a damp cloth, to extend the drying time.
Any water that does happen to remain in the oven will turn to steam and attempt to escape when the first fire is lit. The oven is prone to cracks at this stage. For this reason, it is imperative that the oven is given enough time to dry, while the heating of the oven itself should be done gradually. This remains true for both brick and cob ovens.
When creating the first ever fire in the newly built oven, aim at keeping the fire small, while you gradually increase the heat. Avoid using large pieces of wood, as that may lead to a rapid increase in heat. The purpose of building up the heat is to ensure the oven is fully dried and cured, and that the potential for issues arising from residual moisture are minimized. The initial fire should be spread over a 6 hour period. Once you have allowed the heat to dissipate over night, the oven should be carefully inspected for signs of cracks and weaknesses, and the necessary repairs should be performed. On subsequent firing, you may use larger pieces of wood, and heat the oven up to its full potential.
Cooking with a Pizza Oven
Cooking using a pizza oven is a fun way to get a great tasting and easy to make pizza. The oven is designed in such a way that the pizza is evenly cooked, and comes out ready much quicker than a conventional gas or electric oven. For these reasons, it is unsurprising that cooks in Italy, where the modern day pizza originated from, still prefer to make pizzas in wood-fired ovens!
Pizza Oven Check Lists
How to Build the Oven
- Identify a suitable location which is safe, aesthetically pleasing, and easily accessible.
- Build the oven foundation out of wood, brick, or stone.
- Create a level surface for the firebricks. This is generally done using cement.
- Place fire bricks on a bed of sifted sand and fire clay. Ensure the hearth is level, the bricks are butted up against each other and that no mortar is used.
- Create a temporary structural support foundation for the building of the oven walls, out of sand or wood.
- Lay fire bricks or cob to build the walls, door and chimney of the oven.
- Apply a covering of aluminum foil over the oven wall.
- Apply a thin layer of insulation over the oven walls. This could be using Vermiculite, Perlite cement or a fire blanket.
- Apply a final aesthetic layer over the oven walls. This is called brick or cement cladding.
- Allow the building material to fully cure and dry upto a week or more.
- Remove temporary structural support and fire the oven for the first time with a very small fire.
- Over time slowly increase the intensity of the fires until the oven is at operational temperatures.
- Cook a pizza in your new oven at temperatures of around 370°C (700°F).
How to Cure a Pizza Oven
- Before using your pizza oven, you will want to cure it first. This will ensure a longer shelf-life of the pizza oven.
- Use dry wood for easy burning. Denser or wet wood tends to smoke in large quantity.
- Make small fires inside the oven to cure the walls slowly. This should be done over a period of five days to reduce the likelihood of cracking and other issues.
How to Prepare a Pizza Oven Fire
- Scrunch news paper into balls and place them in the middle of the oven.
- Place small twigs and branches over the news paper.
- Light the news paper.
- Continue adding small branches to build the heat of the fire.
- Gradually increase the size of the wood pieces to the fire.
- Always use dry wood to make the fire in your oven. Initially, the oven may smoke. This will diminish as the heat builds.
- Burn the fire within the oven until the desired temperature has been reached.
- Push the burning wood and embers to the back of the oven out of the way.
- Brush the hearth to remove ash.
- Monitor the oven and the temperature. When cooking pizza the door is generally open and a fire maintained with fuel. For other foods the fire is smothered and the door closed, while the hot embers remain inside the oven.
How to Cook a Pizza in a Wood-fired Oven
- Build a fire within the oven and bring it to around 370°C (700°F).
- Create your pizza dough.
- Prepare your pizza toppings; generally this entails a Napoli sauce, basil, olives, pepperoni, mozzarella.
- Move the fire to the back of the oven and clean the hearth of ash.
- Close the oven door for 2 minutes to allow the temperature of the oven to stabilize and distribute evenly.
- Sprinkle flour on your wood paddle/peel.
- Slide the pizza onto the peel and then slide the pizza off onto the hearth.
- Depending on the temperature of the oven, the pizza will cook from anywhere between 90 to 120 seconds.
- Keep an eye on the pizza to be sure it does not overcook or burn on one side. Rotate with the peel if necessary.
- Remove the pizza with the peel. Allow to cool slightly before consuming.
How to Minimize Minor Cracks
Over time, minor cracks will form on the pizza oven walls. This is generally as a result of severe heat and/or improper utilization of building materials. But it is a common occurrence during the normal heating and cooling process of the pizza oven, therefore should not be a cause for concern. To minimize the cracks, ensure that the oven walls are completely dry before firing the oven.
General Tips
- Try using lighter colored wood for your fire. This will improve fire quality and food flavors.
- Dense wood is smokier and may potentially add a smoky flavor to the pizza.
- Ideally, the thickness of the dome insulation should be maximized so as to reduce the time required to heat the oven, increase the maximum temperature, and prolong the duration the oven stays hot.
- Make the fire at the middle of the pizza oven at the start. Once the temperature has reached the desired heat level move the fire to the sides or back of the oven.
Maintenance
Usually the only maintenance that an wood-fired oven needs is regular cleaning. Once the oven is cold, you can use a rake to clean the ash accumulated at the center or the sides, and carefully sweep it out of the oven. The chimney of the oven also needs regular cleaning and check up. You might need to check for nests or other items that may be hindering the passage of the heat. In short, to keep your oven functioning properly, clean it regularly and make sure the vents are clean with no blockages.
Common Problems
A number of common issues exist regarding pizza ovens in respect to their construction and usage. Possible issues which should be taken into consideration by owners are:
- Maintaining the correct temperature.
- Preventing and fixing cracks as they form.
- Protection from the elements of nature, especially water.
- Ensuring crispy pizza crust.
- Preventing hard pizza crust.
- Preventing an overly smokey flavor.
- Preventing soggy pizzas.
Hidden problems with pizza ovens
Termite and under floor soil treatment
Cracks are a major problem with construction work in general. Cracking may be caused from the expansion of construction joints, or poor construction materials. If a crack forms at a jointing point of the oven floor or dome wall, this may spell trouble as it may allow termites to enter in a cob dome. Termites may loosen the soil under the floor or dome, and in severe cases, lead to the sudden breakage of the entire pizza oven.
For this purpose, poison may be purchased to deter termites from nesting. To properly apply the poison under the oven foundation, create small holes with a diameter of 12-15 mm around the surrounding area. Then, inject termite poison into the created holes. The soil should be saturated with poison to increase the effectiveness of the chemicals. Upto one liter of poison should generally be applied per hole. Choose from the number of termite poison and bait existing in the market. Once the poison has saturated into the surrounding soil, the original holes should be sealed with a suitable cement or cob mixture.
Health and Safety
For your health and safety, and that of your loved ones, do not use any materials in your oven that may contain asbestos, as it has been proven to cause lung cancer.
Vermiculite
Only use the new Vermiculite products. New Vermiculite products do not contain hazardous material but the old versions might. Make sure that the Vermiculite you use is not contaminated with asbestos.
Fire
Remain cautious around fire and have a fire extinguisher handy in case of an emergency. Pizza ovens can become extremely hot (370 degrees Celsius) and thus may lead to burns if mishandled. Be aware of the danger to pets and children. Rinse burns under cold running water for at least 15 minutes before seeking medical treatment.
Methods of firing the oven vary widely, but the one commonly called a "top down" fire will burn cleaner, producing less smoke, and heating the oven faster with less fuel burned. See the video section under "cooking" for videos illustrating this best practice in a wood-fired oven. [1]
Using the Oven
Do not use bare hands while the oven is hot, as the extreme oven temperatures may cause third degree burns on contact with human skin. Use long oven mits for protecting hands and arms while handling pots, or working with oven fires. Don't use liquid fuel such as petrol or lighter fluid when starting a fire in the oven. The process may be dangerous and may lead to strong flavors being absorbed into the surrounding brick. Do not use water to extinguish the fire. Water causes adverse affects on the structure of the oven. Instead, the oven should be allowed to cool naturally.
Use a metal shovel and bin if the remaining ashes are to be removed. It is important to ensure that the ashes have cooled entirely before disposing them off. Do not smother hot ashes with dirt or sand while disposing; the ashes may remain hot under the surface and can create a safety hazard if individuals accidentally step on them.
Sourcing Materials
Sourcing materials for building a pizza oven can be difficult due to the types of materials and techniques involved. For individuals that have a free and easily accessible supply of clean clay, a cob oven might be the most practical approach. If a brick oven is desired then the key materials needed are brick, insulation and cement.