Ymullaji
Building a pizza oven foundation out of brick starts with preparing the location. First you must find a suitable location to build the oven. The location should be a protected area such as a well sheltered corner or inside a kitchen. The location should be considerate of ventilation, access for a chimney and the most common direction of the wind.
Once a suitable location for construction has been found a strong foundation is necessary for building the hearth and oven dome upon. Generally the pizza oven will weigh over a ton when complete and thus requires a very solid base. The dimension of the foundation should generally be dependent upon the desired working space around the oven, the potential for desired expansion in the future, the size and shape, finish style and the depth of the oven. See the following table for example foundation sizes:
| Internal Dimensions | Hearth Surface Area | Dome Shape | Vault Height | Door Height | Door Width | Flue Width | Foundation | Pizzas (10") |
|---|
| 30" diameter (76cm) | 706inch2 (4,363cm2) | Igloo | 16" (41 cm) | 10" (25 cm) | 16" (41 cm) | 18" (46 cm) | 53" x 66" (135cm x 145cm) | 1-2 |
| 34" diameter (86cm) | 907inch2 (5,808cm2) | Igloo | 16" (41 cm) | 10" (25 cm) | 18" (46 cm) | 20" (51 cm) | 57" x 70" (145cm x 180cm) | 2-3 |
| 42" diameter (106cm) | 1,385inch2 (8,824cm2) | Igloo | 18" (46 cm) | 11" (28 cm) | 18" (46 cm) | 20" (51 cm) | 65" x 78" (165cm x 200cm) | 4-5 |
| 50" diameter (130cm) | 1,963inch2 (13,273cm2) | Igloo | 22" (56 cm) | 14" (36 cm) | 18" (46 cm) | 20" (51 cm) | 73" x 86" (185cm x 220cm) | 7-9 |
| 32" x 36" (82cm x 92cm) | 1,152inch2 (7,544cm2) | Barrel | 16" (41 cm) | 10" (25 cm) | 16" (41 cm) | 18" (46 cm) | 55" x 72" (140cm x 180cm) | 1-2 |
| 35" x 39" (90cm x 100cm) | 1,365inch2 (9,000cm2) | Barrel | 18" (46 cm) | 11" (28 cm) | 18" (46 cm) | 20" (51 cm) | 58" x 79" (150cm x 200cm) | 3-4 |
| 47" x 59" (120cm x 150cm) | 2,773inch2 (18,000cm2) | Barrel | 22" (56 cm) | 14" (36 cm) | 18" (46 cm) | 20" (51 cm) | 70" x 99" (180cm x 250cm) | 5-6 |
| 59" x 71" (150cm x 180cm) | 4,189inch2 (27,000cm2) | Barrel | 28" (71 cm) | 18" (46 cm) | 22" (56 cm) | 26" (66 cm) | 82" x 111" (210cm x 280cm) | 10-12 |
Materials Required
The type and quantity of materials required will depend on the material chosen and the size of the foundation. Construction of a 55" x 72" (140cm x 180cm) foundation requires around 330 housing bricks or 80 besser blocks. Around 6 bags of premix mortar will be required to join the blocks. If using hollow besser blocks rather than solids, the center of the constructed walls should be filled with cement mix. This will require an additional 6 bags of premix cement. The walls will then be capped with a solid cement foundation.
| 55" x 72" (140cm x 180cm) | 65" x 78" (165cm x 200cm) | 70" x 99" (180cm x 250cm) |
|---|
| General purpose concrete mix | 30 bags | 38 bags | 48 bags |
|---|
| Reinforcing steel bar | 32m | 37m | 44m |
|---|
| Cement sheeting | 3m2 | 4m2 | 5m2 |
|---|
| Scrap wood for the temporary cement dam | 8m | 10m | 14m |
|---|
| General purpose mortar mix | 6 bags | 8 bags | 10 bags |
|---|
| Besser blocks | 50 | 60 | 80 |
|---|
| Steel lintel | 2m | 2m | 2m |
|---|
| Portland cement | 2 bag | 2 bags | 3 bags |
|---|
| Vermiculite | 1 100L bags | 2 100L bags | 2 100L bags |
|---|
Tools
| Wheel barrow |
| Concrete mixer |
| Shovel |
| Chalk line |
| Grinder (Cutting reinforcement steel and besser blocks) |
| Builders level |
| Measuring tape |
| Bricklayers trowel |
| Builders pencil and paper |
| Bucket, brush and sponge |
| Safety equipment. eg. Gloves, dust mask, eye protection, ear protection |
Construction Steps
| Step 1 | Clear and level the dirt ground. |
|---|
| Step 2 | Lay and compact a 4" (10cm) bed of road base. |
|---|
| Step 3 | Create a wood frame for the concrete. |
|---|
| Step 4 | Lay plastic and reinforcement steel in the wood frame. |
|---|
| Step 5 | Mix, pour and level concrete. Allow to cure. |
|---|
| Step 6 | Dry lay 3 courses of concrete besser blocks leaving a gap in the front for access. |
|---|
| Step 7 | Lay the final course of blocks using steel lintels to span the gap. Ensure the blocks are level, plumb and square. |
|---|
| Step 8 | Fill every second block core with reinforcement steel and concrete mix. |
|---|
| Step 9 | Lay a sheeting base for the hearth foundation to be poured on. Create a frame and temporary legs to hold the sheet in place. |
|---|
| Step 10 | Build a 8" (20cm) tall wood support frame around the top of the walled structure to contain the poured concrete. |
|---|
| Step 11 | Place 1/2" reinforcement steel in the frame at 12" centers. |
|---|
| Step 12 | Mix, pour and level a 4" (10cm) concrete foundation. |
|---|
| Step 13 | Mix, pour and level a 4" (10cm) vermiculite cement mix foundation. |
|---|
| Step 14 | Allow the concrete to cure and then remove the supporting wood. |
|---|
| Step 15 | Begin construction of the hearth. |
|---|
The concrete footing is the lower most section of the oven foundation, upon which the block brick wall will be built. The composition of the soil will determine the thickness that the foundation should be to withstand the weight placed upon it. Generally it is recommended that the concrete be laid with a thickness of at least 4" (10cm) and contain internal supporting reinforcement steel.
Prepare the soil by removing grass and creating a level surface using a shovel or mattock. Depending on the soil and location it may be necessary to dig to a greater depth to avoid laying the concrete directly on soft sand or loam. Build up the earth with a minimum of 3" (7.5cm) base of crushed rock or gravel and compact with a sledge hammer or by stomping. This will provide a solid base for the concrete and allow for adequate drainage. Take 4 wooden planks to make a square form for the foundation concrete footing. Use wooden stakes to support the sides. Once the form is completed lay a sheet of plastic on the bottom. This will prevent the concrete from drying too quickly and not curing properly. Ensure the wooden form is level, square, and facing in the correct direction before proceeding. Measure the frame via multiple diagonal sections to ensure that the walls are square and plumb. Utilise a builders level to ensure the foundation will be level.
Place 1/2" (1cm) thick metal reinforcing steel rods ("rebar") within the wooden form in a grid pattern. Tie the rebar together with wire and lift the steel off the surface with either bricks or rebar stand-offs. Mix, pour and level concrete within the wooden form. Due to the large amount of concrete required it is suggested that a concrete mixer be utilised, or have an external contractor deliver the concrete. Ensure the concrete is smoothed to a perfection suitable for the wood storage area. Once the foundation footing had been made the concrete should be left to cure for a few days. Ideally lay wet hessian cloth oven the concrete to extend the drying time and improve the structural strength. When the foundation slab is dry remove the wood support forms carefully.
Concrete Type
Concrete used throughout the oven foundation will generally be standard Portland cement based concrete mix plus a final layer of insulation cement mix. In some instances it may be necessary to use a refractory concrete if the concrete is to come into direct contact with the oven fire. Generally this is not recommended and so standard concrete will be suitable. For mortaring the fire bricks of the dome a refractory mortar should be utilised.
Portland Cement Concrete Mix Ratio
| Crushed fire bricks (grog) or gravel | Portland cement | Sand | Lime |
|---|
| 3 | 2 | 2 | 0.5 |
Structure Walls
Dry laying the besser blocks
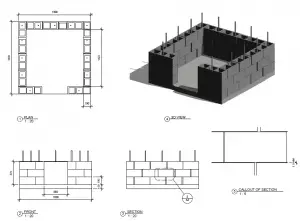
The structure walls are placed upon the foundation footing concrete so as to build up height for the oven foundation. The hearth foundation will eventually be built upon the structure walls so as to form a flat base for the oven hearth to be laid. The walls are generally constructed out of standard concrete besser blocks 8" x 8" x 16" (190 x 190 x 390mm) or 8" x 8" x 8" (190 x 190 x 190mm). The walls will be constructed with an opening at the front to allow access for storage of firewood.
Begin by dry laying the besser blocks in the shape of the structure walls leaving an opening at the front for access to store fire wood. Depending on the width of this opening it may be necessary to install an additional support column to reduce the risk of sagging. The blocks will be laid on top of each other without the use of mortar as this will simplify and quicken the process. Concrete will be poured into the block openings at a later stage to provide for stability. Begin with the first course of blocks and be sure that the blocks are square, plumb, and level before progressing. The blocks should lay flush with the footing foundation. Errors at this stage will be progressively harder to correct at later stages. Ensure that level measurements are made along the block work, width ways, and diagonally. Continue laying blocks to three courses.
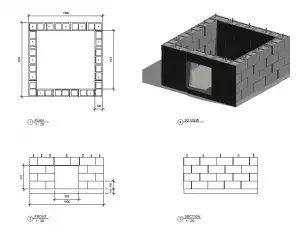
Completed walled structure
The fourth course of blocks will span the gap created in the front for access. Steel lintels or angle irons may be used as the support for the besser blocks. Use a grinder with a diamond blade to grind 1/2" (1cm) front the bottom of each block that will stand on the steel lintels. This will ensure that the blocks lay level with the other walls. Confirm that the blocks are all level before progressing.
The wall blocks will be held in place by concrete placed in every second core. Begin by cutting a piece of reinforcement steel and placing this in the cores. Mix and pour concrete into the cores. It may be beneficial to make the concrete mix more wet than usual so as to ease the process of pouring the mix. Allow the concrete to set before progressing.
Alternatives to Besser Blocks
A number of alternatives to besser blocks exist for building the structure walls. These might include using standard housing bricks or stone held together with mortar. As with the besser blocks the objective is to raise the structure for the establishment of the hearth foundation that will provide a flat surface to build the hearth on.
Hearth Foundation

Hearth sheeting temporary support
Generally the hearth may be supported by either a steel reinforced concrete slab or a prefabricated metal tray. A concrete hearth foundation is a slab which rests on the structure walls so as to provide a flat, solid and insulated base for the laying of the hearth. The thickness of concrete slab will be dependent upon the strength of the concrete mix, the width the slab must span, and the weight of the oven placed on top. A 4" (10cm) thick slab is generally recommended for a span of 5' (150cm), and 5" (13cm) for a 6' (180cm) span. Upon this slab is laid the insulation layer to prevent heat dissipating from below the oven.
Sheeting Base
The concrete poured to form the foundation base will need to be supported in place by a wood frame and a sheeting layer as the bottom. Generally cement sheeting is recommended as the base however 3/4" (2cm) plywood will also work.
Plywood Sheeting
If utilising plywood it is recommended that the wood form be built to allow easy removal of the plywood once the concrete has cured. Problems may occur due to the wood potentially rotting over time under the oven. This will mean making the wood sheet 3/8" (1cm) smaller than the span that the sheet is covering. The sheet may be held in place by a temporary wood frame under the sheeting. Construct the supporting frame for under the plywood using 9 lengths of 2" by 4" pine for the legs, and 5 lengths of 2" by 4" pine for the top. As the plywood will be laid upon this wood support, build the support 1" (2.5cm) from the top of the besser block walls. This gap will allow for the plywood and shims to create the perfect level. 1/4" (0.5cm) shims are small pieces of wedge shaped wood that is used to slightly increase a gap. Through using these shims the leveling of the plywood sheet is made much easier.
Create a square frame out of the 5 lengths of 2" by 4" for the inside of the structure opening. Place wood legs at each corner of the oven span and place the frame on top. On top of the frame place the plywood sheeting. Use the shims to raise the sheeting to be flush with the top of the besser block walls. Add additional 2" by 4" legs to the middle of the support to prevent sagging. Use masking tape to fill the gap created on all sides of the plywood sheeting and the structure walls. Utilise a concrete release agent or vegetable oil on the plywood to prevent it bonding with the concrete.
Cement Sheeting
As cement sheeting is durable and will not rot or be damaged through water exposure the sheeting may be built into the structure and left in place after the concrete slab has cured. If the span of the cement sheeting is large or the sheeting used is particularly thin, a supporting wood frame will be required underneath as with the plywood sheeting. If the cement sheeting is sturdy and may withstand the weight of the wet concrete placed above without sagging, the wood frame support will not be required. The cement sheeting should be cut to 2" short of the support besser block walls such that space is available for concrete to flow into the besser block cores. Once the concrete slab has cured this supporting sheet will not be removable and may safely stay in place.
Wood Supporting Frame
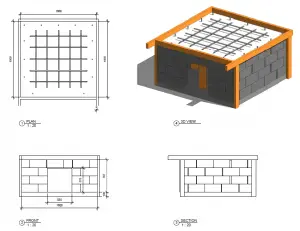
Wood supporting form, sheeting and reinforcement steel
Once the sheeting layer has been put in place the wood frame that will contain the concrete may be built. The wall forms may be build out of 2" by 4", 2" by 8", or similar type wood plank dimensions depending on the thickness of the hearth foundation. The foundation is generally comprised of 4" (10cm) of reinforced concrete, and 4" (10cm) of insulating vermiculite cement mix, thus will be 8" thick. If using insulating fire board or insulating fire bricks the thickness may be different.
Built the frame around the outer edge of the walled area which contains the foundation sheeting. The form should be set at the top of the outer walls such that the poured concrete foundation will create a complete and level top that is flush with the walls. Support the form walls with 2" by 4" wood legs in the same manner as with the under foundation sheeting. Utilise shims to create the proper level. Ensure that the walls are level, flush, plumb and square before continuing. Take length and level measurements at multiple diagonal angles to ensure consistency.
Reinforcement Steel
Reinforcement steel known by tradesmen as "rebar", is utilised in the foundation to increase the structural strength of the concrete and reduce the risk of cracks developing. Rebar utilised should be of 1/2" (1cm) thick or greater. The rebar is placed within the wood form 12" (30cm) apart creating a thatch pattern. The steel should be cut to lengths so that they are 2" (5cm) short of the wood form walls. This is important to ensure that the steel does not protrude from the finished cement. As the steel is not corrosion resistant it will be prone to degrade if not protected by the concrete. Tie the rebar together using wire to prevent movement during the concrete pour. Elevate the rebar off of the sheeting floor using either scrap bricks or rebar stand-offs.
Laying the Concrete
Once the foundation sheeting, wood form and reinforcement steel have been setup the concrete may be poured. Consider utilising a concrete release spray or vegetable oil on the wood form to prevent the concrete from bonding and making removal difficult. Mix the cement up utilising either an automated cement mixer or by hand using a wheelbarrow. If possible it is recommended that an automated cement mixer be utilised due to the quantity of concrete required. The concrete should be mixed utilising the recommended amount of water as prescribed by the concrete mix provider. Generally concrete attains the highest level of structural strength if the minimum amount of water is utilised and the drying process is prolonged. Pour the concrete into the wood form up to the desired height leaving space for the subsequent insulation layer. Level the concrete smooth with a trowel.
Insulation Layer
Once the foundation concrete has been poured and leveled the insulation layer may be constructed. The insulation layer may be made out of 2" (5cm) ceramic fiber insulating board, 3" (7.5cm) insulating fire bricks, or more commonly 4" (10cm) vermiculite cement mix. The purpose of the insulation is to reduce the rate that heat dissipates from below the oven hearth.
Vermiculite Cement Mix
Mix up the vermiculite and cement in the ratio of 5 parts vermiculite to 1 part Portland cement. First dry mix the ingredients to create consistency and then add water. Use a wheelbarrow and shovel to mix the vermiculite and cement by hand rather than with an automatic cement mixer. As the vermiculite can be soft and easily damaged, a cement mixer may reduce the size of the particles and thus the effectiveness of the finished product. Pour the cement mix onto the existing concrete foundation and level the insulating layer with the top of the temporary wood form walls.
| Portland Cement | Perlite or Vermiculite |
|---|
| 1 part | 5 parts |
Can the entire concrete slab be composed of Vermiculite cement?
It is not recommended that the entire foundation slab be made of Vermiculite cement even if it is reinforced with reinforcement steel. Vermiculite cement does not have the structural strength of regular cement and may crack or collapse due to the weight of the oven placed above. If the Vermiculite cement were to be further strengthened with a higher ratio of cement within the mix, the insulation properties of the mix would diminish. It is always recommended that a structural layer of cement be created for strength and this layer be covered with an insulation layer of Vermiculite cement or similar.
Curing the Concrete
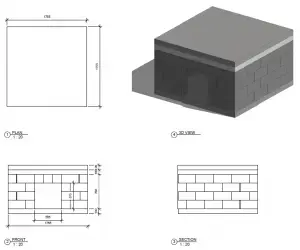
Hearth foundation complete
Generally the less water used and the longer the concrete remains wet during the curing process the more structurally solid the final product will be. If concrete is allowed to dry rapidly this will prevent the curing process from completing properly and may result in the concrete becoming brittle. Concrete mixed with too much water will likely crack when the structure fully dries. It is recommended that concrete be mixed with a minimum amount of water and measures be put in place to reduce the drying time. If the foundation is in the sun or in an environment that is particularly hot or dry this will be exacerbate the problem. It is suggested that the foundation be wet periodically with a hose after it has been poured and leveled, and that plastic or wet hessian be placed over the foundation to reduce the evaporation rate.