Ymullaji
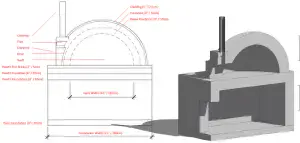
Pompeii oven dome diagram
A brick pizza oven dome is usually constructed as either an igloo or barrel dome out of medium density fire bricks. Both shapes are constructed in much the same fashion with bricks, mortar and usually with a supporting frame. Construction of an igloo dome does not necessarily require a frame if completed by a competent brick layer. Fire clay or refractory mortar is normally employed so as to prolong the lifespan of the oven. Cracks may develop over time with regular building mortar however these will be within the oven and not readily noticeable. Over a prolonged period structural damage as a result of the cracks may cause pieces of clay or mortar to flake into the oven, or for the integrity of the oven to be in jeopardy.
History of Brick Ovens
Technically, Brick Oven is the colloquial term for what is known as the Masonry Oven. Ovens first came into existence in the Italian town of Pompeii, and have since then been used to make probably one of the world's most loved foods: pizza. The natives of the Persian Gulf region use Masonry Ovens to make Khubz bread. In the Indian Subcontinent, masonry ovens known as Tandoors are used to make the staple bread of the country, which is known as Chapatti. Other dishes like Tandoori Chicken, Mutton and assorted delicacies are also prepared in these Tandoors, thus making them an integral part of the Indian Culinary Scene.
The original wood fired masonry oven is also known as the "Black Oven", due to the fact that the smoke used as primary fuel often results in accumulation of soot on the roof of the oven. These found popularity in Medieval Europe/ Colonial America also made use masonry ovens in pizzerias and bakeries. As time evolved, newer and stronger substances, such as cob and adobe, came to be used alongside bricks.
Methods for Building a Brick Pizza Oven Dome
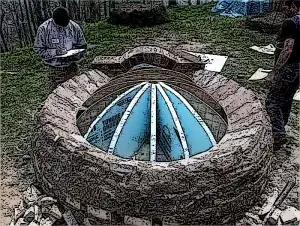
Igloo oven with internal wood support
There are generally three methods adapted to build a brick pizza oven dome:
- Free standing: Chains of self supporting brick circles constructed on top of one another.
- Styrofoam: Styrofoam vanes are cut according to the shape of the dome and then placed inside while the wall of bricks is built around it, shaping the dome according to the Styrofoam as they go. When the dome is complete, the vanes are removed.
- Sand form: A dome shaped structure is built out of wet sand. The bricks are then coated with mortar as they are placed against the form.
Dimensions of the Pizza Oven Dome
See the below table for some suggested pizza oven dimensions.
| Internal Dimensions | Hearth Surface Area | Dome Shape | Vault Height | Door Height | Door Width | Flue Width | Foundation | Pizzas (10") |
|---|
| 30" diameter (76cm) | 706inch2 (4,363cm2) | Igloo | 16" (41 cm) | 10" (25 cm) | 16" (41 cm) | 18" (46 cm) | 53" x 66" (135cm x 145cm) | 1-2 |
| 34" diameter (86cm) | 907inch2 (5,808cm2) | Igloo | 16" (41 cm) | 10" (25 cm) | 18" (46 cm) | 20" (51 cm) | 57" x 70" (145cm x 180cm) | 2-3 |
| 42" diameter (106cm) | 1,385inch2 (8,824cm2) | Igloo | 18" (46 cm) | 11" (28 cm) | 18" (46 cm) | 20" (51 cm) | 65" x 78" (165cm x 200cm) | 4-5 |
| 50" diameter (130cm) | 1,963inch2 (13,273cm2) | Igloo | 22" (56 cm) | 14" (36 cm) | 18" (46 cm) | 20" (51 cm) | 73" x 86" (185cm x 220cm) | 7-9 |
| 32" x 36" (82cm x 92cm) | 1,152inch2 (7,544cm2) | Barrel | 16" (41 cm) | 10" (25 cm) | 16" (41 cm) | 18" (46 cm) | 55" x 72" (140cm x 180cm) | 1-2 |
| 35" x 39" (90cm x 100cm) | 1,365inch2 (9,000cm2) | Barrel | 18" (46 cm) | 11" (28 cm) | 18" (46 cm) | 20" (51 cm) | 58" x 79" (150cm x 200cm) | 3-4 |
| 47" x 59" (120cm x 150cm) | 2,773inch2 (18,000cm2) | Barrel | 22" (56 cm) | 14" (36 cm) | 18" (46 cm) | 20" (51 cm) | 70" x 99" (180cm x 250cm) | 5-6 |
| 59" x 71" (150cm x 180cm) | 4,189inch2 (27,000cm2) | Barrel | 28" (71 cm) | 18" (46 cm) | 22" (56 cm) | 26" (66 cm) | 82" x 111" (210cm x 280cm) | 10-12 |
Constructing the Internal Brick Wall
Upon the hearth construct a supporting frame for the bricks to lay against. This may be made as with the cob dome out of wet sand and newspaper. Alternatively you can use scrap wood to make the shape.
- Mix the mortar to the correct ratio and a workable consistency, and begin laying bricks at the base of the oven structure. Ensure you closely follow the outline of your supporting frame structure. Keep in mind that the outside of this structure will not be visible so concentrate on the aesthetics of the internal wall.
- Continue laying fire bricks until your supporting structure is covered.
- Ideally your oven's vent should be placed in front of the oven door. Begin construction of the hood oven the front of the oven door leaving a hole for the chimney.
After constructing the internal brick wall you will need to cover the brick with an insulation layer to further improve the heat retaining properties of the oven.
Steps to Build a Brick Pizza Oven Dome
When building the dome of your oven, keep in mind to concentrate on the first two courses. If done correctly, these two will shape the subsequent courses on their own. In the first step, you should decide the direction in which you will lay your bricks, thus deciding the shape, diameter and the inward curve of your dome.
The First Course

First course of fire bricks on the hearth
It should be a ring of bricks cut in half and set upright. Depending on whether you want the dome to be high or low, you can make the corresponding part of the brick face inwards. For example, letting the two and a half inch part face inwards will give you a low dome, whereas letting the brick stand upright, with the nine inch part facing the inside will result in a higher dome shape.
Do not worry about your diameter right now: it can be adjusted as the ring takes formation.
Mortar
The mortar used to construct the dome may be either standard building mortar or high heat resistant fire clay mortar. If it is predicted that the oven structural integrity may be compromised if the mortar cracks then it is suggested that fire clay mortar be used in the construction. For small ovens the minor cracking of standard mortar due to the high heats will generally only be a cosmetic issue from within the oven. Since the use of the mortar depends on the heat retention capacity of the oven, a calcium aluminate based mortar with no traces of Portland cement will not crack in high heat environments. This, however, will be expensive. A more economical option will be to use an altered Portland cement mortar with fire clay, sand, and lime. It will not be as durable as the calcium aluminate mortar, but will provide improved heat retention when compared to the standard mortar because of the constituent Fireclay.
Do not use a mortar that contains a water soluble binder. This type is not waterproof, and is thus the wrong product for pizza ovens.
Standard Mortar Mixture
| Sand | Portland Cement | Lime |
|---|
| 6 | 1 | 1 |
Fire Clay Mortar Mixture
| Sand | Fire clay | Portland Cement | Lime |
|---|
| 10 | 6 | 2 | 3 |
The Second Course
The bricks used for the second layer should also be cut in half, but lay on the wide edge as opposed to the thinner one. You can use a wooden shim and determine the angle of the inward curve by cutting it according to your needs. The best way to do it is to first try it out on a dummy layout: this will remove any scope for error.
In case you are using firebricks, remember to soak them in a bucket of water before you mortar them. The main reason behind doing this is that firebricks are more porous than clay, and will thus dry out the mortar quickly if not moist. The curing process for cement creates heat: thus, if the immediate moisture content is too low, it may reduce the effectiveness of important properties like strength, and compromise the integrity of the dome. You want to begin laying your bricks with high heat mortar. Place two bricks with a wooden shim between them. Once you have them cemented into place, remove the shim and fill the empty space with more mortar. Thus, you will get your desired shape as you keep laying the bricks according to the wood shim.
Building the Other Layers
The most important thing to remember while laying all your subsequent layers is the position of the keystone. A keystone, in simple words, is a brick that cements each chain in its place. The shape and size of the keystone may differ based on the shape or requirement of the chain. Another thing to remember is to start every new layer next to, or just over the opening of the oven. This will ensure that your keystone is not conspicuous or sticking out of the rest of the dome. The best way to place the keystone is to keep building until you reach the end of the chain, where no brick fits. At this point, make a paper template of a brick and place it between the last brick and the oven opening. Measure this template and then carefully place it over another brick, followed by the cutting the brick in question to the dimensions of the template. You can now place this newly shaped brick in the place of the paper template.
Steps to Build a Brick Pizza Oven Dome
When building the dome of your oven, keep in mind to concentrate on the first two courses. If done correctly, these two will shape the subsequent courses on their own. In the first step, you should decide the direction in which you will lay your bricks, thus deciding the shape, diameter and the inward curve of your dome.
The First Course
First course of fire bricks on the hearth
It should be a ring of bricks cut in half and set upright. Depending on whether you want the dome to be high or low, you can make the corresponding part of the brick face inwards. For example, letting the two and a half inch part face inwards will give you a low dome, whereas letting the brick stand upright, with the nine inch part facing the inside will result in a higher dome shape.
Do not worry about your diameter right now: it can be adjusted as the ring takes formation.
Mortar
The mortar used to construct the dome may be either standard building mortar or high heat resistant fire clay mortar. If it is predicted that the oven structural integrity may be compromised if the mortar cracks then it is suggested that fire clay mortar be used in the construction. For small ovens the minor cracking of standard mortar due to the high heats will generally only be a cosmetic issue from within the oven. Since the use of the mortar depends on the heat retention capacity of the oven, a calcium aluminate based mortar with no traces of Portland cement will not crack in high heat environments. This, however, will be expensive. A more economical option will be to use an altered Portland cement mortar with fire clay, sand, and lime. It will not be as durable as the calcium aluminate mortar, but will provide improved heat retention when compared to the standard mortar because of the constituent Fireclay.
Do not use a mortar that contains a water soluble binder. This type is not waterproof, and is thus the wrong product for pizza ovens.
Standard Mortar Mixture
| Sand | Portland Cement | Lime |
|---|
| 6 | 1 | 1 |
Fire Clay Mortar Mixture
| Sand | Fire clay | Portland Cement | Lime |
|---|
| 10 | 6 | 2 | 3 |
The Second Course
The bricks used for the second layer should also be cut in half, but lay on the wide edge as opposed to the thinner one. You can use a wooden shim and determine the angle of the inward curve by cutting it according to your needs. The best way to do it is to first try it out on a dummy layout: this will remove any scope for error.
In case you are using firebricks, remember to soak them in a bucket of water before you mortar them. The main reason behind doing this is that firebricks are more porous than clay, and will thus dry out the mortar quickly if not moist. The curing process for cement creates heat: thus, if the immediate moisture content is too low, it may reduce the effectiveness of important properties like strength, and compromise the integrity of the dome. You want to begin laying your bricks with high heat mortar. Place two bricks with a wooden shim between them. Once you have them cemented into place, remove the shim and fill the empty space with more mortar. Thus, you will get your desired shape as you keep laying the bricks according to the wood shim.
Building the Other Layers
The most important thing to remember while laying all your subsequent layers is the position of the keystone. A keystone, in simple words, is a brick that cements each chain in its place. The shape and size of the keystone may differ based on the shape or requirement of the chain. Another thing to remember is to start every new layer next to, or just over the opening of the oven. This will ensure that your keystone is not conspicuous or sticking out of the rest of the dome. The best way to place the keystone is to keep building until you reach the end of the chain, where no brick fits. At this point, make a paper template of a brick and place it between the last brick and the oven opening. Measure this template and then carefully place it over another brick, followed by the cutting the brick in question to the dimensions of the template. You can now place this newly shaped brick in the place of the paper template.
Common Questions
What shape dome should I construct?
Generally the choice of oven dome is between a circular igloo or a rectangular barrel shape. The difficulty in construction may be slightly higher with an igloo, and the ease of use with a rectangular hearth slightly easier, however largely the decision we be based off of personal preference and aesthetics.
Can I use normal red builder's bricks for the dome?
For ovens which are designed to last a long time it is generally recommended that you do not use regular red builder's bricks for the construction of the oven dome. Regular bricks do not have the heat tolerance of fire bricks as their alumina content is not as high. Over time due to the expansion and contracting that these bricks will experience due to the heat variation, the structural integrity of the bricks diminishes. This can result in the bricks cracking, flaking, or failing all together. The result may be that the oven does not look aesthetically pleasing, there results in brick particles falling onto the food, or the oven could potentially become a safety hazard or collapse.
What kind of bricks will be optimum for building a brick pizza oven dome?
Most builders recommend using medium duty firebricks to construct both your dome and the cooking floor of your oven. The dome plays an important part in heat retention, and the right firebricks will help it reach and withstand the higher temperatures that you might need to make your pizza. Usually, a standard (2 ½ inches* 4 ½ inches* 9 inches) brick cut in half will give you the shape of the dome. However, you can also choose other sizes, depending on which the dome should be around four to four and a half inches thick. If you want to bake bread, you can coat the oven dome with an inch and a half thick layer of clay mortar, which will further increase the mass of the oven. However, the above requirements make for a very high thermal mass when compared to domestic use, and therefore are better suited if you have a habit of baking regularly or a business depending on it.
How thick should the oven wall be?
The thicker the walls of the oven the greater the thermal mass the oven will have. The thermal mass of a wood fired pizza oven in conjunction with the effectiveness of the insulation determines how long the oven takes to heat up, the amount of thermal energy that can be stored, and the duration that will take the oven to cool down. A long cool down duration will allow for the cooking of different food items sequentially after the fire has expired. For example an oven brought to temperature for cooking pizza may then be used for roasting, and baking of bread, and then finally drying of fruits such as tomatoes at the later stages. Generally it is recommended that that for a personal home use oven the dome have a thickness of 4 inches (10 cm or 1 fire brick) and the insulation also be 4 inches (10cm) thick.
The material used for the walls and for the insulation additionally affects the oven effectiveness along with the thickness. A medium such as fire brick which has a very high bulk density and heat conductive properties requires less thickness than a less effective medium such as cob. Similarly with the insulation, fire blanket is generally more effective than insulating fire brick or vermiculite cement, and thus the thickness chosen will depend on the material chosen. When choosing the wall and insulation material the efficiency of the material, the initial costs and ongoing operation costs, and the types of food to be cooked should all be considered. The below table gives example thicknesses, heat up and cool down times for an oven constructed out of fire brick and vermiculite cement as insulation.
| Internal Dome Thickness | Insulation Thickness | Heat Up Duration | Cool Down Duration |
|---|
| 4" (10cm) | 4" (10cm) | 1 hour | 12 hours |
| 4" (10cm) | 2" (5cm) | 2 hour | 6 hours |
| 2" (10cm) | 4" (5cm) | 30 minutes | 4 hours |
| 6" (15cm) | 6" (15cm) | 2 hour | 24 hours |
Should I use a form to build the dome?
You can choose to either use a form or not to build your oven dome. However, both choices have their pros and cons.
Reasons for not using a form while building a pizza oven dome:
- It is easier to construct an oven dome without one.
- Not using a form will take you less time to construct than when you use one.
- This method will allow you to have access to the inside of the dome while still building it.
- Thus, you will be able to clean the leftover mortar as you go, and ensure that you do not find any particles in your food in the future.
- This method also reduces the risk of running into issues with self support in the future. Oftentimes, builders depend too much on the form they use, and thus cannot tell whether the dome will be able to stand on its own. In such cases, the final structure often turns out to be too weak to support its own weight and, as a result, collapses.
Advantages of Using a Form
- It helps you maintain the shape of the dome.
- It gives you more leeway in deciding how you will lay the chain of bricks. Additionally, you can measure your progress and map out how to proceed further by laying bricks against and making estimates before actually laying the mortar.
- Furthermore, if you have any doubts about this method, you can use foam vanes, which do not allow the bricks to stick to them.
Things to Keep in Mind while Building an Oven Dome
These are the things that you should keep in mind while building your Oven Dome:
- The dome shape should absorb heat from the wood fire.
- It should reflect stored/retained heat.
- It should reflect heat from a sustaining fire inside the oven from the roof back to the cooking surface.
- It is better to use plastic gloves while working with mortar. This will keep your hands safe from wear and cracks.
- Cutting the bricks in half will ensure a nice circle formation. In fact, the first layer of the dome should be parallel to the oven’s cooking floor.
- Use a sponge to clean the clay off the bricks while it is still damp. This will give you a clean looking brick pizza oven. It will be harder to get the mortar off once it has hardened.
- Remember to clean the mortar off the bricks on the inside, otherwise the residue can end up in your food when you start to cook.
- The simplest way to complete your oven is to make the chimney right above the opening of your oven. This will ensure the escape of smoke without having to construct a channel.
Construction Steps - A Summary:
| Step 1 | Build the oven hearth over which the dome will be constructed. |
|---|
| Step 2 | Construct a temporary supporting form if desired out of sand, wood or polystyrene. This is not recommended until the layer courses. |
|---|
| Step 3 | Soak the fire bricks in water to prepare them for laying. Cut full sized fire bricks to half bricks if necessary. |
|---|
| Step 4 | Dry lay the first course of half bricks around the base. Adjust the shape to minimize the need for brick cutting. Include the door opening. |
|---|
| Step 5 | Prepare the mortar for laying the fire bricks. |
|---|
| Step 6 | Mortar between the joins on the outside of the first course fire bricks. The bricks should lay flush with the hearth and there should be no mortar visible from within the oven. |
|---|
| Step 7 | The second and subsequent half bricks are laid on their wide edge. Offset the bricks to the previous course so the joins are staggered. Use a wood shim to place the brick with the desired angle. Use a leveling tool to help maintain the proper brick angle. |
|---|
| Step 8 | Once no more bricks can be laid place a cut keystone brick to lock each course in place. |
|---|
| Step 9 | Continue laying courses until the final keystone brick is placed in the top. The final most steep courses may require a temporary internal support structure to be build. |
|---|
| Step 10 | Build the oven opening arch and flue. Leave a reveal of 1/2" at the oven opening for the door to sit against. |
|---|
| Step 11 | Build the oven chimney and insulation. |
|---|