
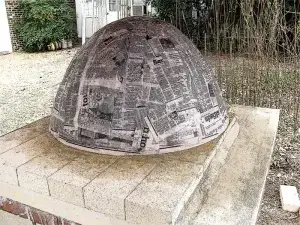
Cob oven on a stone foundation
A
cob pizza oven dome is a basic structure
built out of a combination of mud, sand, water and straw. The dome is constructed over an oven
hearth, which is created from cob, stone slabs, brick or
fire bricks. Once the hearth or base has been developed, a builder may begin to construct the
wood fired pizza oven dome. Domes constructed out of cob consist of clay, sand, soil, water, and straw to act as a binding agent. As cob is soft and malleable before it dries, a supporting foundation like a sand dome is usually created to hold the cob in place during the construction and drying phase.
The cob dome is relatively cheap to construct as compared to a brick dome. Costs will vary widely however depending on the locality and the ease of availability of skilled builders. Despite this a cob oven may potentially be built with largely free or cheap ingredients, whereas a brick oven generally costs a minimum of $500 USD.
Cob Ingredients
There are three ingredients that play a crucial part in the composition of cob: sand, straw, and clay. The different materials play different roles to maintain structural strength and reduce cracking.
Sand
- Sand is strong and can reduce shrinking.
- Coarse sand and stones make up the aggregate in cob in much the same way aggregate performs in concrete.
- About 30-40 gallons (6 - 10 buckets) will generally be enough depending on the environment, requirements and oven size.
Clay
- Clay bonds the sand and straw into an indivisible monolithic system.
- Sieving the clay/soil through a 1.5-inched wire mesh will eliminate larger rocks and stones while breaking up clumps of clay.
- About 8-12 gallons (4 - 7 buckets) is generally sufficient.
Straw
- Long straw pieces help connect the cob to the wall preventing the clay from flaking.
- Straw provides strength against pulling forces.
- Straw is great for cracking resistance or prevention.
- Three bales of yellow, dry straw is generally sufficient. More should be prepared if necessary.
Among these ingredients the most important raw material in making a cob oven is straw. Straw creates an insulating layer for the oven, and thus needs to be chosen very carefully. The straw used has to be very clean, dry, and free from mold. When building a small oven two or three bales of straw will be enough. Large ovens however may require up to four bales. A larger quantity should be used when opting for molding the cob shapes and/or decorations so as to improve longevity.
Note that grass and hay should never be used in constructing cob ovens. Hay is green in color and usually used as fodder to feed cows and horses. Straw is always yellow and dry. Using hay or grass as an alternative of straw will ensure the eventual decomposition of the oven. Additionally they are not strong enough to provide the required wall strength.
Other materials that are used in making cob are: gravel (which can be purchased for a small amount from any construction materials store), empty wine bottles (it is best to use old ones so as to minimize expenses), rocks, tarp, and water. Using subsoil can improve the quality of the cob mixture. If you do plan on adding subsoil, make sure it does not contain any traces of topsoil, since the latter contains living organisms and can cause your oven to decompose.
Building the Foundation
Choosing the Best Location
Building the oven requires a permanent location and it would be best to plan carefully where you would like to have your oven situated. Once the foundation has been laid out, the structure cannot be moved. Ideally, the best location would be outdoors because the cob oven will be fueled by an open fire and will require constant ventilation. However, if one has a fire-proof structure inside the house (e.g. a covered area with stone, brick walls or iron roofing), the oven may also be placed indoors. Here are some other factors one may want to consider in determining the most favorable location of one's pizza oven:
- Fire Hazards
- Sparks from the open fire could be blown and spread to any combustible materials placed nearby. Construct your outdoor oven at a safe distance from your house or any flammable items. If you plan on having an indoor oven, it should be situated in a well-ventilated area void of combustible materials. Furthermore, if you plan on having any constructions in the house, or making additions to it, make sure that materials such as wood chips are not placed near the oven. Also, if you have a wooden deck, make sure the oven would be placed far away from it.
- Wind
- Although the burning fire will be protected by the strong structure of the oven, it needs to be started on the edge of the oven. Strong winds might make it difficult to get it going, maintain a steady flame, or may even reduce the temperature supplied to the oven. If possible, choose a location where there are trees or walls that can shield the oven fire from the wind.
- Distance from the house
- You may want to prepare your pizza in your kitchen, so remember to keep the distance of the cob oven convenient for this purpose.
- Leveled ground
- Finally, lay the foundation on an expanse of flat land to get an even base for your constructed oven. This means choosing a site where there aren't any large rocks, boulders or uneven soil underneath.
Size to Choose
| Internal Dimensions | Hearth Surface Area | Dome Shape | Vault Height | Door Height | Door Width | Flue Width | Foundation | Pizzas (10") |
|---|
| 30" diameter (76cm) | 706inch2 (4,363cm2) | Igloo | 16" (41 cm) | 10" (25 cm) | 16" (41 cm) | 18" (46 cm) | 53" x 66" (135cm x 145cm) | 1-2 |
| 34" diameter (86cm) | 907inch2 (5,808cm2) | Igloo | 16" (41 cm) | 10" (25 cm) | 18" (46 cm) | 20" (51 cm) | 57" x 70" (145cm x 180cm) | 2-3 |
| 42" diameter (106cm) | 1,385inch2 (8,824cm2) | Igloo | 18" (46 cm) | 11" (28 cm) | 18" (46 cm) | 20" (51 cm) | 65" x 78" (165cm x 200cm) | 4-5 |
| 50" diameter (130cm) | 1,963inch2 (13,273cm2) | Igloo | 22" (56 cm) | 14" (36 cm) | 18" (46 cm) | 20" (51 cm) | 73" x 86" (185cm x 220cm) | 7-9 |
| 32" x 36" (82cm x 92cm) | 1,152inch2 (7,544cm2) | Barrel | 16" (41 cm) | 10" (25 cm) | 16" (41 cm) | 18" (46 cm) | 55" x 72" (140cm x 180cm) | 1-2 |
| 35" x 39" (90cm x 100cm) | 1,365inch2 (9,000cm2) | Barrel | 18" (46 cm) | 11" (28 cm) | 18" (46 cm) | 20" (51 cm) | 58" x 79" (150cm x 200cm) | 3-4 |
| 47" x 59" (120cm x 150cm) | 2,773inch2 (18,000cm2) | Barrel | 22" (56 cm) | 14" (36 cm) | 18" (46 cm) | 20" (51 cm) | 70" x 99" (180cm x 250cm) | 5-6 |
| 59" x 71" (150cm x 180cm) | 4,189inch2 (27,000cm2) | Barrel | 28" (71 cm) | 18" (46 cm) | 22" (56 cm) | 26" (66 cm) | 82" x 111" (210cm x 280cm) | 10-12 |
Mixing the Cob
A combination of stirring and compressing is required in mixing the cob and best way to achieve this is to mix using tarps and your feet. Make the mixing site clear of any obstruction and closer to the foundation. This will enable you to work easier and exert less efforts to take the cob to its destination.
First, mix sifted clay and dry sand together then add water to obtain a cookie dough consistency. Do some treading with your feet so the mixture can gradually come together. Do not mix the cob with covered feet. It is easier and faster to mix barefoot. Doing this can also help you check if the mixture has reached the desired texture.
You can use the tarp to roll the drier mixture onto the wetter mix; continue stomping while adding water until the mixture turns sticky and stiff.
Next, add straw. If the mixture is wetter than expected, use dry straw to counteract the problem and soaked straw otherwise. Add as much straw as possible and continue to fold the pile with the tarp.
Note: The drier the cob mixture, the better. Wet mixture will collapse due to its own weight.
Type of Clay
Clay is a very common mineral composite found in most soils. Different types of soils contain varying amounts of clay. It is rare to find pure clay deposits in nature. Pure clay is at first mined, refined and then sold to various industries for making ceramics.
However, pure clay is not needed in making cob and other earthen building materials. Soil with adequate clay content and can act as an adhesive will do. To acquire an adhesive texture, additional ingredients such as straw are needed. Clay soils have a soft and sticky feel when wet then get tough and hard when dry.
Cob Mixture Ratio
| Clay | Sand | Straw |
|---|
| 1 part | 3 parts | 1 part |
Constructing the Foundation
Before you begin constructing your pizza oven, keep in mind the desired height of the oven and size of the dome. Smaller ovens will be easier to heat up and will provide more heat efficiency with consistent results. A comfortable height of the dome is equally essential, to avoid back injuries and muscle strains when cooking your pizza.
Once you have decided on the size and height, it's time to begin by building a sturdy base that will hold the height and weight of the oven. You can gather large stones and form them into a ring, roughly four feet in diameter, on the spot of your oven. Pile these stones atop of one another until you have a cylindrical wall that befits the height you have in mind. Fill the inside of the wall with sand or concrete, packing it in tightly. One of the most effective ways to make sure that you have a sturdy base is to use the flattest and the smoothest rocks right at the bottom. You can use the more crude and coarse ones once you move towards the top. Additionally, fill the ring as you go along--this will make the base stronger.
The ideal height for your oven should be about six inches below your waist. This should be followed by at least four inches of insulating mass and an inch of firebricks. You can use a yardstick to guide you with the height of your oven.
The platform should be as flat as possible. A thin layer of sand is essential over the rock platform, as it is treated as an aggregate and is used to reduce shrinkage of clay during the drying process and strengthen the oven walls. The most suitable sand to use is called angular sand. Avoid using silt or smooth sand for the job and opt for concrete sand which is a more cost-effective option. The sand works perfectly in building the oven form and is also used as a plaster for final touches.
Following this step, place high-density firebricks over the sand to conceal the oven floor. Use newspaper to completely cover the brick and guarantee an even surface. This will also make the oven take its form. Use damp sand to pile over the newspaper, making it aesthetically pleasing. It is imperative that the opening of the oven is around 60% of the interior's height. Lastly, tightly cover the finished form with sand and layers of slightly-wet newspaper.
Cob Oven Insulation
Underfloor Insulation

Bottles used as the floor insulation
The oven floor or the layer of fire bricks should be insulated properly. This can be achieved by putting in place some empty beer or wine bottles. These should be laid on their side. Bottle necks should face towards the center while the bottoms of the bottles should rest against the circumference of the ring. This is a perfect insulating layer below the fire bricks (the oven floor).
These glass bottles make pockets of air between the fire bricks and the stone base, which are great heat barriers and prevent the layer of stones from transferring heat from the oven.
The procedure is as follows: Build a tall, rounded slab of cob on top of the base. The round slab is essential for the foundation of the oven. Ideally, it should be around four inches thick. The diameter of the stone base will be 48 inches. In addition, make sure that the (foundation) slab has the same diameter. Once this has been accomplished, a ring of cob must be built on top of the slab.
Eventually, seal the insulating area with more cob. Make sure it is 2 inches thick so the insulation is, altogether, 6 inches tall. Additionally, this will also make the the base foundation strong and sturdy.
Dome Insulation
The straws are mixed with sand to act as an insulator for the cob oven walls. This is very effective and has been a practice for hundreds of years.
Laying the Hearth
The
hearth used for a cob pizza oven is made on top of fire clay or sand. It is typically constructed from
fire brick and usually laid on a 150mm to 300mm thick layer of insulation. The insulation layer can be made from anything--such as empty recycled bottles, lime, straw, sand. These elements can all be used to have a sturdy base.
An effective fire brick oven hearth can be made by arranging recycled firebricks (approximately 15-17 firebricks should be enough) into a neat and systematic position. These will serve as the bottom of the oven where the food will be baked. The hearth bricks will then be positioned onto a thin layer of sand so they can be at a firm level. The firebricks are a crucial component for the construction of the pizza oven dome. When exposed to intense heat, firebricks do not split, unlike regular ones. Additionally, they have perfect square edges, which can make a perfectly smooth floor for the cob oven.
Creating the Oven Shape Structure
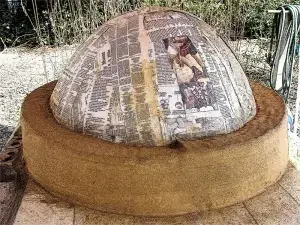
Sand mold with wet news paper
Now you may proceed to making a mound atop where your actual dome will rest. Begin making your mound by placing moist sand onto the hearth. The small amount of water will allow the sand to be more pliable as you shape it. Continue to add sand to create a mold on the inside of the pizza oven. You may want to use a curved tool to ensure a uniform shape. Keep in mind that the actual walls of the pizza oven will be placed on this mold, and hence the final size of the oven should be substantially larger than your mound. When your sand mound is complete, place wet newspapers over it. The moisture will keep the paper in place, and will allow for easy removal of the sand at a later time.
Fortunately, there aren't any set rules for sculpting ovens, as cob requires no boundaries whatsoever. They can be completely individualistic and suited to the owner. If you are looking for something simple and effective, the traditional dome shape is perfect. Ensure that you are working at a comfortable height (waist-level is recommended to avoid strains and pulling your back) and begin crafting your oven with cob. Depending on the size of your dome, mix the cob together, but make sure you leave approximately 15-20 centimeters for the dome's walls on the outskirts before achieving your desired height. Let it dry at a certain extent. Make sure it isn't completely dry as you will need to cover it with plastic. This will allow the dome structure to maintain its shape.
Applying the Cob
Applying the cob to build the oven walls
While preparing cob is easy and cost-effective, applying the material is just as simple – requiring only a little bit of precision and preparation. Once you have trampled the cob and produced a sturdy and acceptable texture, grab a handful and mold it into a ball. If the cob ball cracks or splats, add sand to produce a better consistency.
You can either apply cob via a trowel or adapt a more fun and traditional approach by applying it with your hands. Once you’ve created the cob balls, place the cob directly against the hearth of the oven and around the outside of the sand mold. This will create a ‘base’ layer of cob. Once this has set apply a new layer of cob directly on top, scooping the mixture with your hand to place it over the framework with force. Be sure to smooth down the edges to give it a more professional and striking finish.
Removing Excess Cob
It is imperative to exercise precaution while making cob because too much clay can make your oven crack once the cob dries. However, this can be counteracted by fiddling with a ratio of the remaining ingredients to maintain the 1:3:1 ratio of clay, soil and straw respectively. Once the cob has been applied to the pizza oven and you find it is within a suitable height and weight, you are ready to smooth it down. However, should you stumble across some excess cob, you can smooth it down using a trowel to give it a clean look.
Building the Chimney
Building the chimney for your wood-fired pizza oven doesn't take too much building expertise, but it does take concentration in order to gain the best outcome for the oven.
- Cut a circular hole at the top of your cob oven behind the arch entrance.
- Neaten edges with a knife before building up a 20cm chimney around the hole using more sand and clay.
- Seal all gaps that are present between the brick arch, the entrance, and the chimney with the excess sand-clay mix.
- Allow the mixture to dry.
Smoothing the Cob
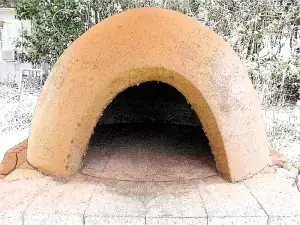
Completed oven with sand removed
For your cob oven to look professional and effective, you will need to consider how and when to smooth the cob edges. In order for the oven to cook food properly, the walls will need to be at a certain width, shape and size; your oven will need sufficient airflow as well as heat administration. Once you have built your oven, preferably in the dome shape you desired, you will need to smoothen the surface before covering it with wet newspaper.
Any crevices should be filled in and smoothed down: the best results are found by using a trowel as it gives an even finish. To ensure the oven looks complete, get a brush and bucket then smear the damp brush over the cob. This will remove all rough edges and leave your cob oven looking professional and pristine.
Curing the Oven
Avoid starting a fire immediately in your newly-created oven. This will cause cracking and lead to heat loss resulting in poor functionality. Instead, the oven should be allowed to cure slowly at a low temperature. Once the oven dries completely, you can repair any cracks with additional clay then carefully remove the sand and newspaper from the oven door.
Oven Shelter
It is important to keep in mind the elements of nature and what they can do for your newly-constructed cob oven. Here are some helpful tips in using and upkeeping your cob oven:
1. A roof protects your oven from bad weather, allowing you to cook even through rough climate. Sleet, rain and snow have the ability to erode cob over time, leading for the need to freshly plaster the oven every year. When building your oven roof, keep in mind to construct it in such a way as to allow ample working space while giving it enough height to protect users from the intense heat when firing up the oven and exiting smoke. Experts recommend a minimum of 7 feet should be left under the roof for clearance purposes.
2. No matter how much care you put in, the oven is made of clay and risks of cracking are very likely to occur. This happens when the cob oven expands and then contracts from a change in temperature. Therefore, consider plastering the oven every now and then to avoid rupture and heat loss.
3. It takes up to an hour of heating to produce the correct temperature for cooking in a cob oven – lit up your oven and prepare your food in the meanwhile!
4. Once the cob oven is lit, the fire should be regularly stoked and fed.
5. Use dry, hard wood as the oven cools by retained heat.
6. The oven will remain hot for up to 10 hours or more. This can be increased by adding additional insulation.
7. Since a cob oven stays hot for longer periods of time, you can use it for bulky cooking. Some use the oven for pizzas first, and leave in loaves of bread later.
8. A very significant point – if your oven has been constructed correctly, its outside layer should not heat up, even if in scorching fire. If such a thing happens, it is an indication that the oven has not been insulated properly, and will thus not be as heat efficient as it should be.
Cob vs Brick Oven
There is no difference between cooking in a cob or brick oven. A brick oven is made up of various refractory material – bricks, clay and stones. In fact, brick ovens have been around for thousands of years and work the same way as cob ovens do. This is because the fire is built on the rear in both cases and the smoke built up inside the oven disappears as the oven becomes hotter.
The best brick ovens are built by hand, as is the case with cob ovens. The difference lies in the fact that in a brick oven, the bricks are the insulating materials, while in a cob oven, straws fulfill the same function.
Moreover, professional brick ovens produce higher and more stable temperatures which can be at par with conventional ovens that could be used for bread baking. Brick ovens take a minimum of one hour to be ready to cook. At such a high temperature, you can have your pizza ready in as little as 90 seconds.
Common Issues
Here are some common issues that have been faced by cob oven users to be wary of:
- Smoke
- Some say that food produced using wood-fueled ovens end up smelling like smoke. This is not true though, because the smoke dissipates at very high temperatures. The cooked food are therefore free from the smell of smoke.
- Temperature
- Another issue with the cob oven arises when wanting to measure the temperature. This is a challenge considering that there is no thermometer to do so. The problem can be solved by installing a thermometer in the oven, though it will increase construction costs.
- Testing Clay Plasticity
- Since you need elastic clay to make your cob oven, you will also need to test your clay before you put it onto the structure. This will allow you to determine whether it will give a sufficient finish to your oven. There are a number of tests to determine if any clay content exists in your soil, two of which we will discuss which you can easily remember as the 'Snake and Shake' tests:
Snake Test:
1. Take a handful of soil and remove any visible rocks
2. Mix in a small amount of water, enough to make the soil malleable
3. Roll the soil in the shape of a snake
4. If the snake remains intact, and resists when pulled apart, the soil contains clay; if it crumbles apart, there is little to no pliable clay
Shake test:
1. Fill a quarter of a cylindrical glass jar with crumbled soil, sans rocks
2. Fill it to the top with water
3. Close the lid, and shake well
4. Set the jar down and watch for 10 seconds: You will see sandy solids settle to the bottom. While the rest of the water remains cloudy (with clay)
5. Draw a line on the jar at the top of the sandy sediments
6. Wait for the water to become completely clear. Draw another line at top of the settled clay to represent the sand to clay ratio in the soil. (Note: It is difficult to separate silt in this test. Silt is similar to sand, but with smaller, spherical particles)
- Oven Door
- There are three choices for your oven door: ply, pine and steel. The first, ply, might wear away which is not the best choice. Pine, when soaked in water before being used, will emit steam and will thus give your pizza a crispy crust. Steel doors will take a little more time, but can be carved out by measuring the opening in your oven. You can put in handles to move it when hot.
- Oven Floor
- Get special firebricks for the oven floor, but know that these may border towards the expensive side. You will probably move around your oven a great deal, therefore make sure that you use smooth-edged bricks for the floor. Avoid using wire cut bricks for your oven floor. Additionally, refrain from using ceramic tiles as they tend to crack under intense heat despite their rounded edges.
Steps to Constructing a Cob Dome: A Summary
| Step 1 | Build the oven hearth or base over which the dome will be constructed. This could be a fire brick hearth on a foundation, or a simple mud floor on the ground. |
|---|
| Step 2 | Create cob through a mixture of soil (sand or small stones), clay, water and hay or straw. Mix the cob components either on the ground or on laid out tarp. Mix the components together until completely combined. |
|---|
| Step 3 | Take a handful of cob and shape it into a fist-sized ball. |
|---|
| Step 4 | Place the fist-sized cob ball at the base of the oven. This should be done forcefully so as to ensure a good bond between the cob and surface. |
|---|
| Step 5 | Continue to place cob as a complete single layer around the base of the oven. The top of the cob lay should slope towards the oven at a 30° angle. |
|---|
| Step 6 | Smoothen out the joints between each cob piece. |
|---|
| Step 7 | Begin on the second layer of cob. Continue until the sand/newspaper layer is completely covered. |
|---|
| Step 8 | Repeat the previous steps to make a second layer of cob insulation atop the first. Ideally, the pizza oven cob wall should be at a minimum of 4 inches (10cm) thick. The thicker the wall, the greater the thermal mass resulting in more heat. With this, the cob oven can sustain a longer cooking time. |
|---|
| Step 9 | When the cob wall is finished, an oven door and a chimney vent may be cut out of the cob. Use a knife or garden tool to slice into the cob and remove excess material. Alternatively, when building the cob wall, these sections may be left devoid of cob. If so, skip this step entirely. |
|---|
| Step 10 | Finish the oven with a coating of clay to give a more smooth, pleasing appearance. |
|---|
Tools
You might start out with a variety of tools and add to them as you go, but you should keep these basic ones in mind:
- Measuring Tape
- Shovel
- Knife/Garden Tool
- Mixer (optional)
- Old Newspaper
- Empty wine/beer bottles
- Trowel
- Bucket
- Safety Equipment (Gloves, dust mask, eye protection)
- Chalk line
- Bricklayers Trowel
Uses and Benefits
Since the cob oven can stay heated for long periods of time, a lot can be cooked aside from pizza. Before cooking, plan a lineup of food you would like to prepare to conserve heat and maximize the usage of your cob oven.
After the pizza and bread, you can actually cook anything. It can go from vegetables, meats, casseroles, soups, stews, cookies, cakes, pies, or puddings. When the oven has gotten cool (usually after several hours), the low heat can be used for drying wood for the next fire.
The following is an elaborate list of food that could be prepared using the cob oven in order of highest to lowest temperatures:
- Pizza with oven-roasted vegetables
- Croissants, raisin yeast-bread, sticky rolls and sourdough bread
- Roasted chicken stuffed with whole garlic, dried apples and asian pears, roasted in ginger wine sauce
- Cake, cookies, braised vegetables, baked parsnips and potatoes with rosemary and garlic
- Baked beans or soups, rice pudding (which can be left to cook overnight), steamed whole-grain sprouted rye bread, steamed Christmas pudding or fruitcake, oatmeal for tomorrow’s breakfast
- When at low heat, you can incubate yogurt, dry herbs or fruit and also dry firewood